So, the subcontractor you work for just landed a new project and it requires AIA® billing. Or maybe you’ve seen your fair share of AIA® forms, but they keep causing headaches. We’re here to help. In a nutshell, AIA® billing is a payment application process for progress billing on construction projects. But to feel comfortable with the process, you need to know more about the nuts and bolts of AIA® billing.
Luckily, you’re in the right place. This guide will cover everything you need to know about AIA® billing, including:
- AIA® billing basics
- Benefits of AIA® billing for construction projects
- Challenges with AIA® billing
- How to complete AIA® billing forms G-702® and G-703®
- Tips for managing AIA® billing documents
Let’s dive in.
AIA® Billing Basics
There’s not a lot of standardization when it comes to construction billing processes. Every GC and every contract seems to have its own unique requirements for when and how subcontractors can get paid.
The American Institute of Architects (AIA®) puts a great deal of effort into bringing order to the chaos. They’ve developed nearly 250 of the most widely-used contracts and forms in the construction industry.
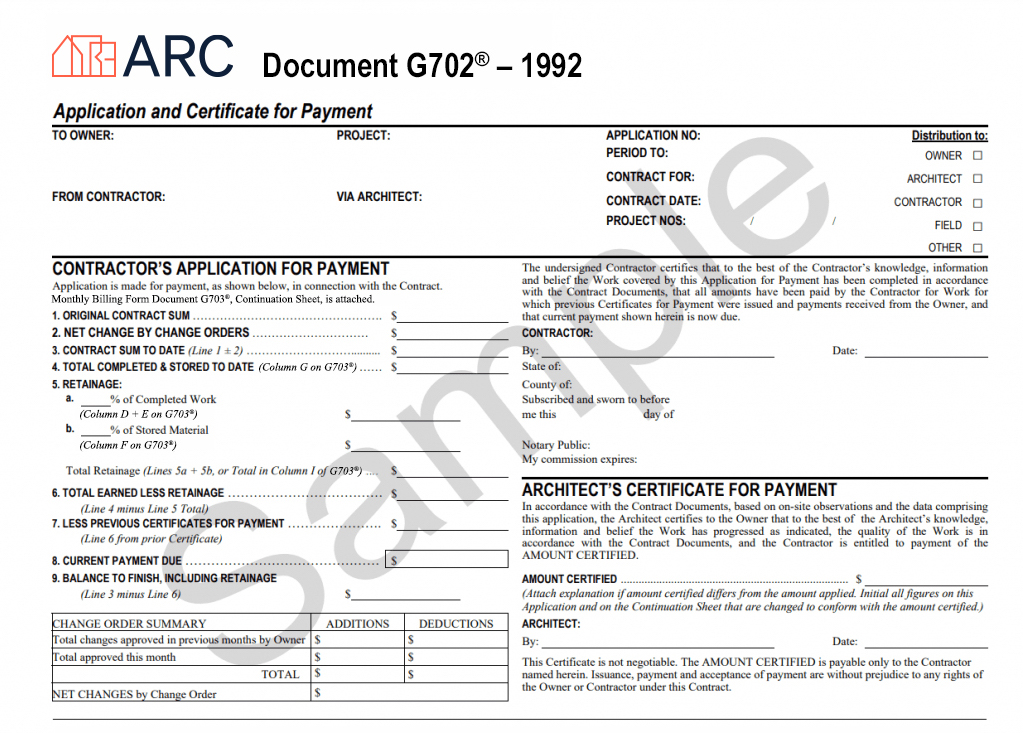
AIA® billing defines the payment process for a progress payment on a project. The goal is to make it clear to the GC and project owner exactly what work you completed to date and during the current billing period so you can get paid. There are two specific forms you’ll use for AIA® payment applications.
The majority of large general contractors use these forms (or their own customized version of them) so it’s only a matter of time before subcontractors encounter them in a contract.
Benefits of Using AIA® Billing for Construction Projects
AIA® forms have all been created with input from contractors, engineers, accountants, lawyers, and other industry experts to meet the needs of everyone involved in construction projects. They streamline and standardize many of the variables in construction billing, like how you format invoices and what terminology you use.
By standardizing these variables, you:
- Reduce billing errors
- Ensure compliance
- Get paid faster
Plus, once you’re comfortable with AIA® billing, it opens opportunities for your firm to work with larger GCs and bid on government projects.
Challenges with AIA® Billing
Most subcontractors find that the pros of AIA® billing outweigh the cons, but there are some challenges to be aware of.


AIA® billing can be complicated at first.
Of course, most construction billing processes are complicated the first time around. AIA® billing requires meticulous record-keeping and documentation, including daily reports, material receipts, and labor hours. Quite the administrative headache, especially for smaller subcontractors. But, just like lien waivers get easier with practice, AIA® billing will, too.
The terms on AIA® forms favor project owners.
Remember, the AIA® is the American Institute of Architects. And while these forms were developed in collaboration with contractors, they ultimately favor architects and project owners. This contract review checklist will help you know what terms to watch out for.
Software integration can be tricky.
Not all construction management or accounting software integrates with AIA® forms. This can lead to manual data entry, increasing the risk of errors and further adding to the administrative workload.
AIA® forms aren’t free.
All AIA® forms come with a cost. G-702® and G-703® are each $39.99 for one-time use. You can get unlimited access to all AIA® forms (except state agency documents) for $1,599.99 per year. But unless you’re managing a high volume of projects, the subscription cost is hardly worth it.
Pro Tip: Even if a project requires AIA® billing, you may not necessarily need to purchase these official forms. As long as you can replicate all the data points and tables, the GC will likely accept non-branded versions. (Or you can use Siteline. We already have more than 15,000 custom billing and lien waiver forms from over 10,000 GCs in our system and can add new ones in minutes.)
Tracking submitted AIA® forms is challenging.
The multi-layered review process (subcontractor to GC to owner) can be lengthy and opaque. Subcontractors often find it difficult to track the status of their pay applications or understand the reasons for delays. (Another pro to using Siteline is that it lets you see the status of every pay app across every project, helping your team proactively and strategically manage billing.)
How to Complete AIA® Billing Forms
It’s always a lot easier to complete a form when you gather all the necessary information in advance. So before you sit down to fill out the G-702® and G-703® documents, there are a few pieces of information you want to have handy.
- Original contract details: property details, project number, contact info for all parties involved, contract date, etc.
- Schedule of Values (SOV): the original Schedule of Values from the project contract detailing every step in the project. The G-703® will document progress toward each line item in the SOV.
- Change orders: any change orders that have been approved to add work to or deduct work from the original project scope.
- Retainage: agreed upon retention amount that the GC is withholding until the project is complete.
- Stored materials details: the total value of any stored materials; info about where they’re being stored, etc.
Once you have all this information on hand, you’re ready to complete the forms.
Section-by-section instructions for G-702® Application for Payment

Part 1: Project Details

- To Owner: the project owner’s name and address.
- From Contractor: the name and address of the contractor requesting payment.
- Project: the name and address of the property where the project is taking place.
- Via Architect: the name and address of the architect involved, if there is one.
- Application No: the number assigned to your payment application.
- Period To: the last date of the period for which you’re billing.
- Contract For: a brief description of the work you’re providing.
- Contract Date: the date the contract was signed.
- Project Nos: the GC’s project number, if there is one.
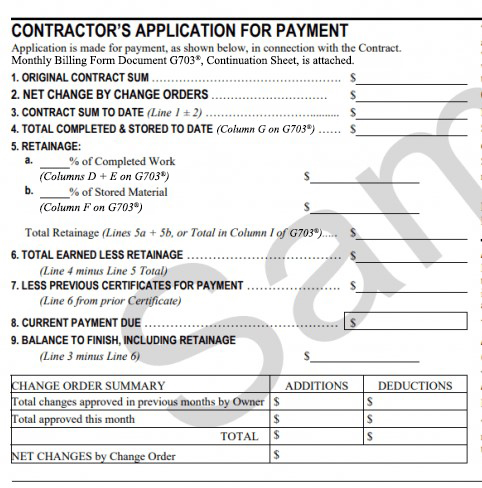
Part 2: Application for Payment

This section is where you calculate how much of a payment you’re requesting.
- Line 1—Original Contract Sum: Enter the total contract value from the original contract.
- Line 2—Net Change by Change Orders: Enter any positive or negative values of change orders. If the change order was to add more work to the project scope, this will be a positive value. If it was to deduct work from the scope, this will be a negative value.
- Line 3—Contract Sum to Date: Add lines one and two together to calculate the current contract total after change orders are considered.
- Line 4—Total Completed and Stored to Date: You’ll need to come back to this to add in the Grand Total after you complete the G-703® Continuation Sheet.
- Line 5—Retainage: There are a couple of parts to line 5.
• First, document the retainage percentages for completed work on 5a and for stored materials on 5b.
• Then, multiply line 5a by the total work completed and multiply line 5b by the total value of stored materials.
• Add these two figures together to calculate the total retainage amount. - Line 6—Total Earned Less Retainage: Subtract the total retainage on Line 5 from the total completed and stored to date on Line 4. This represents the total billable amount that you’ve earned to date.
- Line 7—Less Previous Certificates for Payment: Enter the total for any payments that you’ve already received on the project.
- Line 8—Current Payment Due: Subtract Line 7 from Line 6 to get the current payment due. This is the payment amount you are requesting.
- Line 9—Balance to Finish, Including Retainage: Subtract Line 3 from Line 6. This shows how much will still be due on the contract once this progress payment has been received.
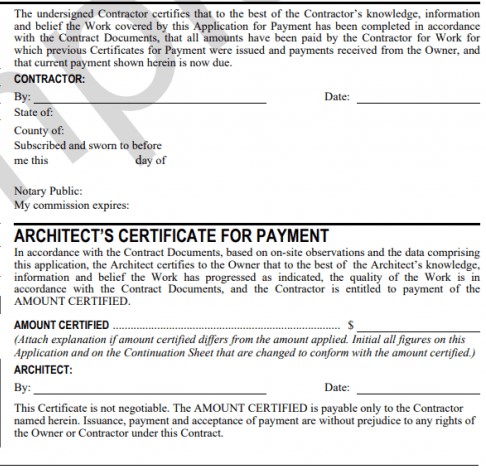
Part 3: Signatures
Part 3: Signatures
The last step is to sign the document and, if applicable, get it notarized.

There are two signature blocks stacked on top of each other. The top section is for you.
Before you sign the form, though, check the project contract to see if the payment application needs to be notarized. The AIA® form was created with the intention of it being notarized, but not all GCs require this, so you may be able to skip this step.
If the contract does require notarization, be sure to get with your notary before you sign.
The last section, Architect’s Certificate for Payment, is for the architect, project manager, or property owner to complete once they review and approve your payment application. So leave this section blank.
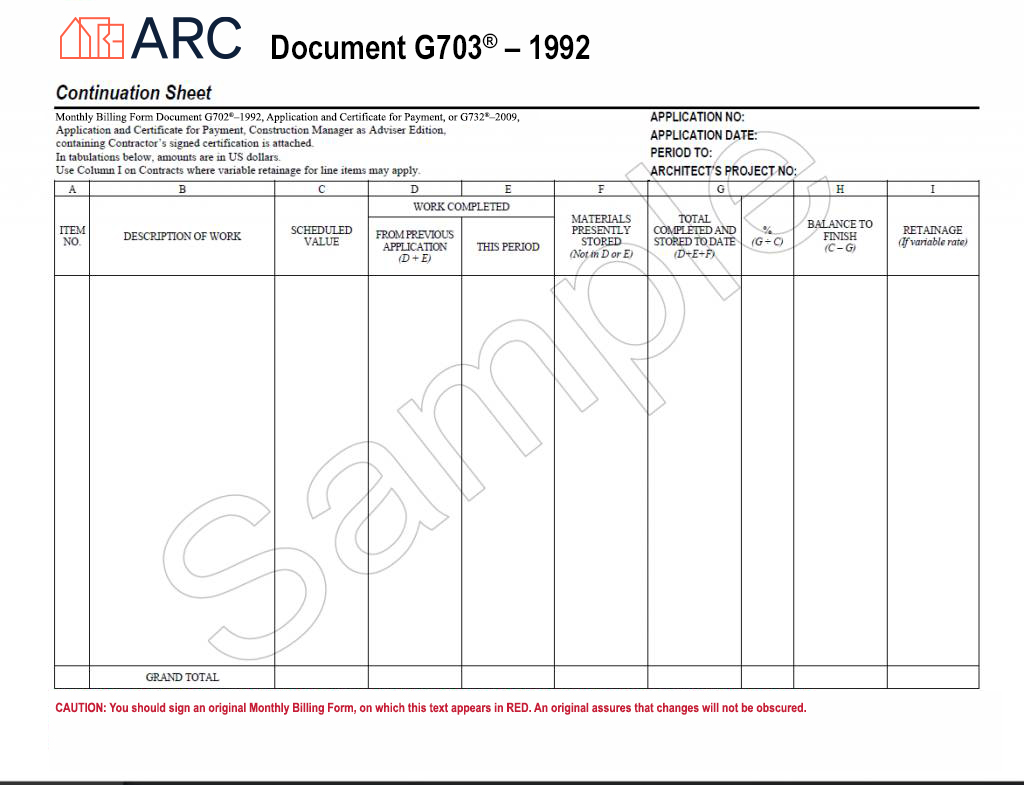
Section-by-section instructions for G-703® Continuation Sheet

Part 1: Application Information
Similar to the Application for Payment, there’s a short header section at the top of the form where you’ll document some basic information.
Simply input the application number, date, and billing period from your G-702®. Then add the project number, if there is one.
Part 2: Table of Work and Values
You’ll use this table to list out all the associated work and materials line items, the cost of each item, and how much has been completed or stored to date.
Let’s take a look at each column.
- Column A—Item Number: The numbers you add here depend on your operations. This could be just a chronological list where the first item you enter is number 1, the second number 2, and so on. But if your billing and inventory systems assign SKU numbers to each task or material, you’ll enter those numbers in Column A.
- Column B—Description of Work: Enter a brief description of the work performed or the materials used for each line item.
- Column C—Scheduled Value: This is how much each line item costs. This figure should match the original SOV that you can the GC agreed upon before the project started. If approved change orders are in place, these values may be adjusted or new line items may be added.
- Column D—Work Completed from Previous Application: If this is the first payment application for the project, you’ll leave this blank. If you previously submitted a payment application, add columns E and D from the previous application together to get this total.
- Column E—Work Completed this Period: Enter the value of work completed this period for each line item. For instance, if the team completed 25% of a line item during the billing period, you’ll multiply column C by 25%. Be sure to subtract any previously billed amount to get the amount completed during this period.
- Column F—Materials Presently Stored: Enter the value of any materials relevant to that line item. You should only account for materials that you’ve already purchased, haven’t yet used, and are stored on-site. In order to bill for Stored Materials you will need to provide the back up required in the contract. This typically includes photos of the materials, insurance information, and the bill of sale.
- Column G: This column is divided in half. The left side is for the value of the total to date and the right side is for the percentage to date.
• Total Completed and Stored to Date: Add the values from columns D, E, and F. This represents the total value of the work you’ve completed during this billing period, plus the materials you’re storing.
• Percent (%): Divide the Scheduled Value in column C by the Total Completed and Stored to Date. This reflects what percentage of each line item has been completed. - Column H—Balance to Finish: Subtract the Total Completed and Stored to Date in column G from the Scheduled Value in column C. This calculates the remaining cost for each line item.
- Column I—Retainage: You will only use this column if the project uses a variable retainage rate. If the retainage rate is fixed, you can skip this.
Once you’ve finished detailing line items:
- Add up all the values in columns C through I.
- Put the totals in the Grand Total row across the bottom.
- Add the Grand Total from column G to Line 4 of your Application for Payment.
What happens after you complete the AIA® billing forms?
Once you complete the forms, you’ll submit them to the GC or project owner. Be sure to check your contract for submission instructions, as well as other documentation you may need to include with your payment application.
Once the GC receives the forms, they’ll either approve and sign them or return them with red lines. If approved, the GC will package it with all the other pay apps and submit the forms for payment. If redlined, they’ll return the forms to you so you can make changes and resubmit.
When the GC submits all the payment applications to the project owner, the owner reviews them. The owner may have their own comments, so there’s still a possibility that your pay app could come back to you for changes.
Tips for Managing AIA® Billing Documents
If you work for a small subcontractor that only has one or two projects at a time, it might not be that difficult to manage all your AIA® billing documents. But more projects mean more contracts mean more payment applications. It quickly becomes a lot to manage.
Here are a few tips to help you keep track of all your AIA® billing documents and ensure you get paid on time.
- Pay attention to each contract’s details. Just because the forms are standardized doesn’t mean everything is. Know when your payment applications are due, what you might need to include beyond the AIA® forms, and how you need to submit pay apps. (We cover all of this in our pay apps guide if you want more info.)
- Communicate clearly with GCs: Establish clear communication channels with the GC regarding any potential issues or changes. Don't hesitate to ask questions or clarify any uncertainties.
- Double-check your work. A single data entry error will throw your total off and can cause your payment application to be rejected. It takes long enough to get paid on construction billing projects. Most subcontractors can’t afford to miss a payment cycle because of a mistake.
- Don’t use Excel. While it may have been a fine solution in 1995, Excel is no longer a sufficient accounting tool. It’s easy to make errors—and not find out about them until it’s too late. There’s no version control. And it doesn’t have any reporting capabilities.
- Track the status of pay apps: Implement dedicated software to track the status of each submitted pay application. Knowing where each application is in the review process helps you follow up proactively.
Get a free demo of Siteline to see how it can help your business.
AIA®, G702®, and G703® are registered trademarks owned by The American Institute of Architects and ACD Operations, LLC. Siteline is not affiliated with The American Institute of Architects or ACD Operations, LLC. Users who wish to use Siteline’s software to assist in filling out AIA® forms must have or secure the AIA® forms. Siteline does not and will not provide users with the forms.
.svg)


%202.webp)